Advertisemen
Introduction:
In our daily development,some times we may need to store data and access it for later use.So as developer choice we need to decide "which way is best to store data?" and this decision making would be change based on amount of data to be store.However windowsphone is very good at this case . Because windowsphone is provided following ways to store our application data.
1)IsolatedStorageSettings:It is very very useful for storing some basic application settings like user profile settings,and especially in login application after login successfully app need to be home screen when user again launch the app.
2)IsolatedStorageFile: It is available from "System.IO.IsolatedStorage" namespace to access files.And i am really addicted with this uses ,because it is very handy and simple way to store data.It is enough for most of applications.And no limit to data store but of course you'll get an exception if you run out of space when writing new data, so you have to handle that properly.
3)SQLite:It is very useful to store data in database with structured way, Mmm this concept is covered by this post.And this article covers windowsphone 8 sqlite database.So if you want to implement database application for windowsphone 7,you may helped from this link Sqlite client for Windows Phone 7 and for sample see this post.
Requirements:
To run this sample ,you must install windowsphone 8 sdk or higher sdk from here.
Table of Contents:
Unfortunately SQLite is directly not available in windowsphone devices.And in previously it included lot of hard steps to setup sqlite in windowsphone application.But now we are very happy ,because of now it is very easy to setup sqlite environment in our apps.So this post covers all about sqlite with beginners level like this.
1)How can i setup SQLite environment?
2)How to perform all SQLite CRUD operations ?
3)How to bind SQLite data to listbox?
4)How to explore my"SQLite" database data?
Description:
SQLite is a very light weight database. In this tutorial I’ll be discussing how to write classes to handle all SQLite operations.So let's start with above hierarchy which is earlier discussed in "Table of Contents".
1)How can i setup SQLite environment?
Sqlite is directly not available in windowsphone ,and don't worry now it is very easy to setup sqlite in windowsphone apps.So we need to follow three steps only (i.e Installing SQLite for Windows Phone SDK,Installing sqlite-net-wp8 package,Installing sqlite-net package)
1.1)Installing SQLite for Windows Phone SDK:
The first step is installing the SQLite for Windows Phone SDK in the Visual Studio that you are using. To do that, click on TOOLS -> Extensions and Updates -> Online -> Then search for "sqlite for windows phone". It should look like the following picture.


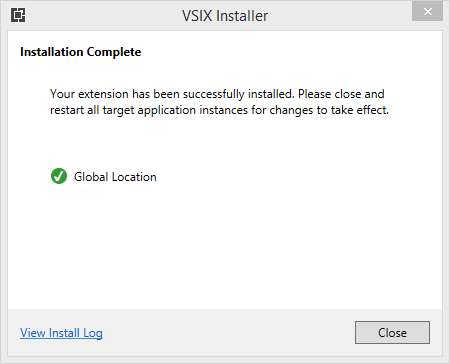
You will be redirected this link .It may not useful for you,but best to read this document.And we need to add this extension to our project like this.
Open Solution explorer,Right click on 'References'=>Choose WindowsPhone=>Extensions =>select 'SQlite for WindowsPhone'=>Press 'Ok'
1.2)Installing sqlite-net-wp8 package:
Now one good news is "sqlite-net-wp8 package" is available on Nuget which is previously not available and i say very thankful to creator "Peter Huene".This is a c++ project can works like mediator between SQLite and our source code. So to install it right click on your project (i.e in my case project name is SQLiteWp8) =>Click on "Manage NuGet Packages" and search for "sqlite-net-wp8" => Click on "Install" button.

Note:if the sqlite-net-wp8 does not use the same version of SQLite for windows phone you will not be able to open the app
1.3)Installing sqlite-net package:
Now we are almost completed SQLite setup.But in addition we need to add sqlite-net package which is available from nuget. Because this package provides two helper classes (SQLite.cs and SQLiteAsync.cs) which are play vital role to perform all SQLite operations.So to install it right click on your project (i.e in my case project name is SQLiteWp8)=> Click on "Manage NuGet Packages" and search for "sqlite-net" => Click on "Install" button.

Remembering Notes:
1)Before you compile you will need to add some conditional compilation constants in the application,otherwise You'll probably get this error message: The type or namespace name 'Community' could not be found.To fix this issue right click on your project =>Choose properties =>Build and set value USE_WP8_NATIVE_SQLITE like this

2)You receive an error cannot find a type or namespace SQLite.Verify you have the conditional constants set. Verify you have added a reference to SQLite.
3)f the sqlite-net-wp8 does not use the same version of SQLite for windows phone you will not be able to open the app
4)"Any CPU" problem:
If you get a warning message as shown below, follow these steps to fix it: Right click on the Solution -> Click on Configuration Properties -> Configuration Manager and change the active solution platform to x86 (If you are using an emulator) or ARM (If you are using a Windows Phone 8 device).

***Wow now whole SQLite set up process is completed,so now we are going to work with all CRUD operations***
2)How to perform all SQLite CRUD operations ?
So its time to perform all SQLite CRUD(Create,Read,Update,Delete) operations.So my thought is in this sample i made one single "DatabaseHelperClass.cs" class for whole application and handling the SQLite operations with this helper class. Lets see first my table structure first

Here i am trying to create Table name is "Contacts" in "ContactsManager.sqlite" database.So my class "Contacts" with all getter and setter methods(Id,Name,PhoneNumber,CreatedDate) to maintain single contact as an object.
C#
public class Contacts
    {
        //The Id property is marked as the Primary Key
        [SQLite.PrimaryKey, SQLite.AutoIncrement]
        public int Id { get; set; }
        public string Name { get; set; }
        public string PhoneNumber { get; set; }
        public string CreationDate { get; set; }
        public Contacts()
        {
            //empty constructor
        }
        public Contacts(string name, string phone_no)
        {
            Name = name;
            PhoneNumber = phone_no;
            CreationDate = DateTime.Now.ToString();
        }
    }
2.1)Writing DatabaseHelper Class to handle database operations(i.e CRUD):
C#
//This class for perform all database CRUD operations
    public class DatabaseHelperClass
    {
        SQLiteConnection dbConn;

        //Create Tabble
        public async Task<bool> onCreate(string DB_PATH)
        {
            try
            {
                if (!CheckFileExists(DB_PATH).Result)
                {
                    using (dbConn = new SQLiteConnection(DB_PATH))
                    {
                        dbConn.CreateTable<Contacts>();
                    }
                }
                return true;
            }
            catch
            {
                return false;
            }
        }
        private async Task<bool> CheckFileExists(string fileName)
        {
            try
            {
                var store = await Windows.Storage.ApplicationData.Current.LocalFolder.GetFileAsync(fileName);
                return true;
            }
            catch
            {
                return false;
            }
        }

        // Retrieve the specific contact from the database.
        public Contacts ReadContact(int contactid)
        {
            using (var dbConn = new SQLiteConnection(App.DB_PATH))
            {
                var existingconact = dbConn.Query<Contacts>("select * from Contacts where Id =" + contactid).FirstOrDefault();
                return existingconact;
            }
        }
        // Retrieve the all contact list from the database.
        public ObservableCollection<Contacts> ReadContacts()
        {
            using (var dbConn = new SQLiteConnection(App.DB_PATH))
            {
                List<Contacts> myCollection  = dbConn.Table<Contacts>().ToList<Contacts>();
                ObservableCollection<Contacts> ContactsList = new ObservableCollection<Contacts>(myCollection);
                return ContactsList;
            }
        }

        //Update existing conatct
        public void UpdateContact(Contacts contact)
        {
            using (var dbConn = new SQLiteConnection(App.DB_PATH))
            {
                var existingconact = dbConn.Query<Contacts>("select * from Contacts where Id =" + contact.Id).FirstOrDefault();
                if (existingconact != null)
                {
                    existingconact.Name = contact.Name;
                    existingconact.PhoneNumber = contact.PhoneNumber;
                    existingconact.CreationDate = contact.CreationDate;
                    dbConn.RunInTransaction(() =>
                    {
                        dbConn.Update(existingconact);
                    });
                }
            }
        }
        // Insert the new contact in the Contacts table.
        public void Insert(Contacts newcontact)
        {
            using (var dbConn = new SQLiteConnection(App.DB_PATH))
            {
                dbConn.RunInTransaction(() =>
                    {
                        dbConn.Insert(newcontact);
                    });
            }
        }

        //Delete specific contact
        public void DeleteContact(int Id)
        {
            using (var dbConn = new SQLiteConnection(App.DB_PATH))
            {
                var existingconact = dbConn.Query<Contacts>("select * from Contacts where Id =" + Id).FirstOrDefault();
                if (existingconact != null)
                {
                    dbConn.RunInTransaction(() =>
                    {
                        dbConn.Delete(existingconact);
                    });
                }
            }
        }
        //Delete all contactlist or delete Contacts table
        public void DeleteAllContact()
        {
            using (var dbConn = new SQLiteConnection(App.DB_PATH))
            {
                //dbConn.RunInTransaction(() =>
                //   {
                       dbConn.DropTable<Contacts>();
                       dbConn.CreateTable<Contacts>();
                       dbConn.Dispose();
                       dbConn.Close();
                   //});
            }
        }
    }
3)How to bind SQLite data to listbox?
In above step 2.1 i created one Database helper class name is "DatabaseHelperClass.cs" which is main head for this sample to perform all SQlite operations.Lets first see my project hierarchy like this

In the app.xaml class lets create a database. In the constructor we check if the database exists and if it does not we create it. Since if there is no file exists ,it will get an exception.
C#
public partial class App : Application
{
    public static string DB_PATH = Path.Combine(Path.Combine(ApplicationData.Current.LocalFolder.Path, "ContactsManager.sqlite"));//DataBase Name
public App()
  {
      if (!CheckFileExists("ContactsManager.sqlite").Result)
            {
                using (var db = new SQLiteConnection(DB_PATH))
                {
                    db.CreateTable<Contacts>();
                }
            }
  }

private async Task<bool> CheckFileExists(string fileName)
        {
            try
            {
                var store = await Windows.Storage.ApplicationData.Current.LocalFolder.GetFileAsync(fileName);
                return true;
            }
            catch
            {
            }
            return false;
        }}
Next I divided my project into MVVM pattern for simplicity.So in Model folder i placed table class name is "Contacts.cs".In ViewModels i placed DB helpers classes(DatabaseHelperClass.cs & ReadAllContactsList.cs).And finally Views folder i placed All my three UI related pages
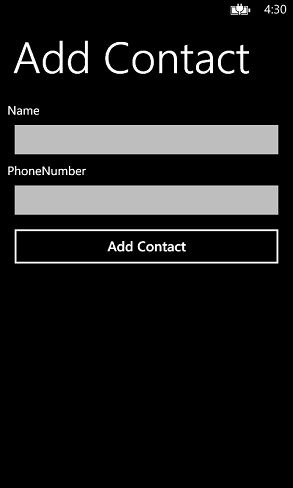
- AddConatct.xaml:This page for adding contact to database,when click on "Add Contact" button it will be add contact in database like this
C#
private async void AddContact_Click(object sender, RoutedEventArgs e)
        {
            DatabaseHelperClass Db_Helper = new DatabaseHelperClass();//Creating object for DatabaseHelperClass.cs from ViewModel/DatabaseHelperClass.cs
            if (NametxtBx.Text != "" & PhonetxtBx.Text != "")
            {
                Db_Helper.Insert(new Contacts(NametxtBx.Text, PhonetxtBx.Text));//
                NavigationService.Navigate(new Uri("/Views/ReadContactList.xaml", UriKind.Relative));//after add contact redirect to contact listbox page
            }
            else
            {
                MessageBox.Show("Please fill two fields");//Text should not be empty
            }
        }
- ReadContactList.xaml:This page for displaying all DB contact list with listbox.And in this screen there is two buttons(Add Contact & DeleteAll) for correspondingly add contact to DB / Delete entire table data.Firstly i made following listbox datatemplate for binding database contacts
XAML
<ListBox BorderBrush="#FF141EE4" Height="auto" BorderThickness="2" MaxHeight="580" Grid.Row="1" x:Name="listBoxobj" SelectionChanged="listBoxobj_SelectionChanged">
                <ListBox.ItemTemplate>
                    <DataTemplate>
                        <Grid Background="Gray" Width="480">
                            <Border BorderBrush="White" BorderThickness="1">
                                <Grid>
                                    <Grid.RowDefinitions>
                                        <RowDefinition Height="Auto"/>
                                        <RowDefinition Height="Auto"/>
                                  </Grid.RowDefinitions>
                                    <TextBlock Grid.Row="0" x:Name="NameTxt" TextWrapping="Wrap" Text="{Binding Name}" FontSize="28" Foreground="White"/>
                                    <TextBlock Grid.Row="1" x:Name="PhoneTxt"  TextWrapping="Wrap" Text="{Binding PhoneNumber}" />
                                    <TextBlock Grid.Row="0" Text=">" FontSize="28" Margin="0,0,35,0" HorizontalAlignment="Right" VerticalAlignment="Center"/>
                                    <TextBlock HorizontalAlignment="Right" Margin="0,0,35,0" Grid.Row="3" x:Name="CreateddateTxt"  TextWrapping="Wrap" Text="{Binding CreationDate}" />
                                </Grid>
                            </Border>
                        </Grid>
                    </DataTemplate>
                </ListBox.ItemTemplate>
            </ListBox>

C#
private void ReadContactList_Loaded(object sender, RoutedEventArgs e)
        {
            ReadAllContactsList dbcontacts = new ReadAllContactsList();
            DB_ContactList = dbcontacts.GetAllContacts();//Get all DB contacts
            listBoxobj.ItemsSource = DB_ContactList.OrderByDescending(i => i.Id).ToList();//Binding DB data to LISTBOX and Latest contact ID can Display first.
        }
When "Add Contact" button is clicked is navigated to "AddConatct.xaml" page to add contact in DB.
C#
private void AddContact_Click(object sender, RoutedEventArgs e)
        {
             NavigationService.Navigate(new Uri("/Views/AddConatct.xaml", UriKind.Relative));
        }
When "DeleteAll" button is clicked ,i done like this
C#
private void DeleteAll_Click(object sender, RoutedEventArgs e)
        {
            DatabaseHelperClass Db_Helper = new DatabaseHelperClass();
            Db_Helper.DeleteAllContact();//delete all DB contacts
            DB_ContactList.Clear();//Clear collections
            listBoxobj.ItemsSource = DB_ContactList;
        }
When selected listbox item ,i navigate to "Delete_UpdateContacts.xaml" page for delete/update corresponding contact details on listbox SelectionChanged event like this.
C#
private void listBoxobj_SelectionChanged(object sender, SelectionChangedEventArgs e)
{if (listBoxobj.SelectedIndex!= -1)
{
Contacts listitem = listBoxobj.SelectedItem as Contacts;//Get slected listbox item contact ID
NavigationService.Navigate(new Uri("/Views/Delete_UpdateContacts.xaml?SelectedContactID=" + listitem.Id, UriKind.Relative));}
}
- Delete_UpdateContacts.xaml:This page is for updating/delete selected contact details

C#
protected override void OnNavigatedTo(NavigationEventArgs e)
        {
            Selected_ContactId = int.Parse(NavigationContext.QueryString["SelectedContactID"]);
            currentcontact = Db_Helper.ReadContact(Selected_ContactId);//Read selected DB contact
            NametxtBx.Text = currentcontact.Name;//get contact Name
            PhonetxtBx.Text = currentcontact.PhoneNumber;//get contact PhoneNumber
        }
When "Delete" button is pressed i done like this.
C#
private void DeleteContact_Click(object sender, RoutedEventArgs e)
        {
            Db_Helper.DeleteContact(Selected_ContactId);//Delete selected DB contact Id.
            NavigationService.Navigate(new Uri("/Views/ReadContactList.xaml", UriKind.Relative));
        }
When "Update" button is pressed i done like this.
C#
 private void UpdateContact_Click(object sender, RoutedEventArgs e)
        {
            currentcontact.Name = NametxtBx.Text;
            currentcontact.PhoneNumber = PhonetxtBx.Text;
            Db_Helper.UpdateContact(currentcontact);//Update selected DB contact Id
            NavigationService.Navigate(new Uri("/Views/ReadContactList.xaml", UriKind.Relative));
        }
4)How to explore my SQLite database data?
Isolated Storage Explorer tool to get the database file.This tool is installed under folder path is Program Files (x86)\Microsoft SDKs\Windows Phone\v8.0\Tools\IsolatedStorageExplorerTool
To use Isolated Storage Explorer, the following things must be true:
- The app that you want to test must be installed on the emulator or device.
- The emulator or device must be running, but the app doesn’t have to be running.
You cannot do the following things with Isolated Storage Explorer:
- You can’t view isolated storage for apps that you’ve installed from the Windows Phone Store.
- You can’t view app settings that are stored in the local folder in Isolated Storage Explorer. These are settings that the app saved by using the IsolatedStorageSettings class.
After that execute following commands from command prompt.
1)First change command prompt directory path to Program Files (x86)\Microsoft SDKs\Windows Phone\v8.0\Tools\IsolatedStorageExplorerTool

2)Get Product Id from project WMAppManifest.xml file Packaging Tab under ProductId attribute (i.e 9748984e-2779-41fb-991f-f99c72414203)
3)if your app is run on emulator excute this command: ISETool.exe ts xd 9748984e-2779-41fb-991f-f99c72414203 c:\data\myfiles

4)if your app is run on device excute this command: ISETool.exe ts de 9748984e-2779-41fb-991f-f99c72414203 c:\data\myfiles
Now we will be found DB content in your computer at c:\data\myfiles like this.

Final Step:
After downloaded from the Store you app may not be create database file.So copy your existing database file and paste it into your project root folder by right click your project=> Add Existing Item=>Browse to c:\data\myfiles\ContactsManager.sqlite. In your Application_Launching event of App.xaml check whether database is existing or not.If not exist,then copy the your database file from installed folder to local folder.Thats it will fix the app store issue.
Note:Make sure to change the Copy to Output Directory property of ContactsManager.sqlite file to Copy if newer.
C#
public partial class App : Application
{
private async void Application_Launching(object sender, LaunchingEventArgs e)
        {
            StorageFile MyDBFile = null;
            try
            {
                // Read the db file from DB path
                MyDBFile = await StorageFile.GetFileFromPathAsync(DB_PATH);
            }
            catch (FileNotFoundException)
            {
                if (MyDBFile == null)
                {
                    // Copy file from installation folder to local folder.
                    IsolatedStorageFile iso = IsolatedStorageFile.GetUserStoreForApplication();
                    // Create a stream for the file in the installation folder.
                    using (Stream input = Application.GetResourceStream(new Uri("ContactsManager.sqlite", UriKind.Relative)).Stream)
                    {
                        // Create a stream for the new file in the local folder.
                        using (IsolatedStorageFileStream output = iso.CreateFile(DB_PATH))
                        {
                            // Initialize the buffer.
                            byte[] readBuffer = new byte[4096];
                            int bytesRead = -1;

                            // Copy the file from the installation folder to the local folder.
                            while ((bytesRead = input.Read(readBuffer, 0, readBuffer.Length)) > 0)
                            {
                                output.Write(readBuffer, 0, bytesRead);
                            }
                        }
                    }
                }
            }
        }
}

Visitors Note:This content may be change in future.if you are looking for SQlite sample for windowsphone store 8.1.You may visit this link :)
FeedBack Note: Please share your thoughts,what you think about this post,Is this post really helpful for you?otherwise it would be very happy ,if you have any thoughts for to implement this requirement in any another way?I always welcome if you drop comments on this post and it would be impressive.
Follow me always at @Subramanyam_B
Have a nice day by Subramanyam Raju :)
Follow me always at @Subramanyam_B
Have a nice day by Subramanyam Raju :)
Advertisemen
Tidak ada komentar:
Posting Komentar