Advertisemen
Introduction:
Recently i found from twitter as 'Coding4Fun Toolkit is Supported for Windows Phone 8.1'.And i want to be say thanks to Hermit Dave for sharing this info on twitter. Now Coding4Fun toolkit v2.0.9 for Windows Platform dev has been released and packages are available for download from Nuget.In WindowsPhone 8.0 we got lot of additional controls from Coding4Fun,The Coding4Fun Toolkit has multiple controls and useful items for XAML based applications.And current version v2.0.9 includes following controls.
- MetroFlow control (Windows 8.1 and WP 8.1)
- Prompts (Toast, User, Message, Input,About, PasswordInput) for WP 8.1
- BrushToBrushConverter now allows use of parameter to set output Opacity.
For more information, please visit this link.However from above available controls,This article will teach you about 'How to use MessagePrompt control in WindowsPhone store 8.1 ?'.
Requirements:
- This sample is targeted for windowsphone store 8.1 OS,So make sure you’ve downloaded and installed the Windows Phone 8.1 SDK. For more information, see Get the SDK.
- I assumes that you’re going to test your app on the Windows Phone emulator. If you want to test your app on a phone, you have to take some additional steps. For more info, see Register your Windows Phone device for development.
- This post assumes you’re using Microsoft Visual Studio Express 2013 for Windows.
Description:
1.1 Installation of Coding4Fun Toolkit:
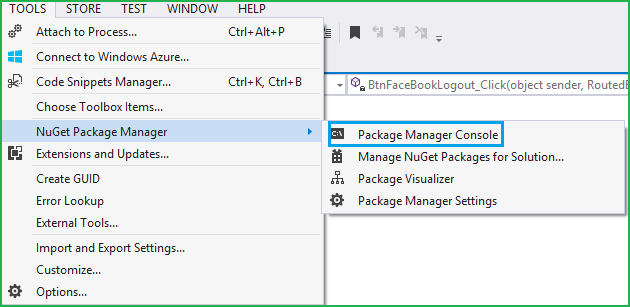
Install the Coding4Fun Toolkit nuget package into the solution by starting the Package Manager PowerShell by following:
Tools->Library Package Manager->Package Manager console
Once the powershell command prompt is running, type the following command
Install-Package Coding4Fun.Toolkit.Controls,
This will add Coding4Fun.Toolkit.Controls.dll in 'References' of the current project like below.
1.2 How to use MessagePrompt control in WindowsPhone store 8.1 ?:
In this article I am going to explain about the MessagePrompt control from the Coding4fun Toolkit.Fortunately now MessagePrompt control is available for WP8.1. As its name says it is a kind of extended popup that displays a message. MessagePrompt can display different content like Title, composite Body content, custom buttons, etc .
Let's make following UI in MainPage.xaml page to use MessagePrompt control in different ways.
- <Grid Background="White">
- <StackPanel Margin="5">
- <TextBlock Text="WP8.1:Coding4Fun MessagePrompt" FontSize="24" Foreground="#FF248ECB"/>
- <Button Margin="0,30,0,0" HorizontalAlignment="Stretch" Content="Simple MessagePrompt" Click="SimplePopUp_Click" Background="#FF68D18A"></Button>
- <Button HorizontalAlignment="Stretch" Content="Custom MessagePrompt With Xaml" Click="CustomPopupXaml_Click" Background="#FF68D18A"></Button>
- <Button HorizontalAlignment="Stretch" Content="Custom MessagePrompt With C# Code" Click="CustomPopupCode_Click" Background="#FF68D18A"></Button>
- </StackPanel>
- </Grid>
Press F5 to run the project and your screen will be appeared like this,
Generally the MessagePrompt is designed to be used in code. The sample code should looks like:
Simple MessagePrompt:
- private void SimplePopUp_Click(object sender, RoutedEventArgs e)
- {
- var ObjMessagePrompt = new MessagePrompt
- {
- Title = "Simple MessagePrompt",
- Body = "Now Coding4Fun MessagePrompt is \n supported for windowsphone 8.1",
- IsAppBarVisible = true,//for showing rounded ok button
- IsCancelVisible = false//to hide rounded cancel button
- };
- ObjMessagePrompt.Show();
- }
Here is an example shows how to use MessagePrompt control. You can use IsCancelVisible property to Show/Hide the MessagePrompt `s cancel button.
Custom MessagePrompt Body with Xaml :
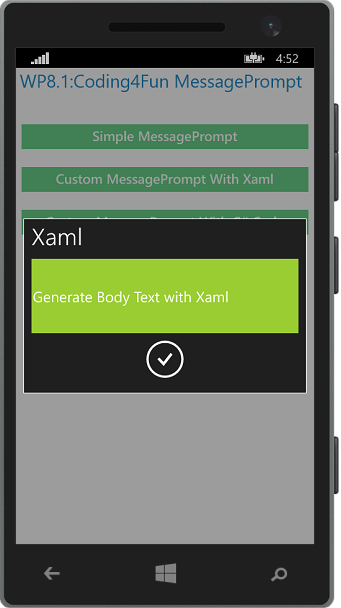
Generally the MessagePrompt is designed to be used in code but sometimes users want to put some composite elements into the popup body so in this case it is easy to define these element in XAML. Here is one possible solution with a UserControl. Just create a new UserControl named UcMsgBody.xaml and add the following code into it:
- <UserControl
- x:Class="Coding4Fun_WindowsPhoneStore.UcMsgBody"
- xmlns="http://schemas.microsoft.com/winfx/2006/xaml/presentation"
- xmlns:x="http://schemas.microsoft.com/winfx/2006/xaml"
- xmlns:local="using:Coding4Fun_WindowsPhoneStore"
- xmlns:d="http://schemas.microsoft.com/expression/blend/2008"
- xmlns:mc="http://schemas.openxmlformats.org/markup-compatibility/2006"
- mc:Ignorable="d"
- d:DesignHeight="300"
- d:DesignWidth="400">
- <Grid>
- <Border Background="YellowGreen" Height="100">
- <TextBlock Text="Generate Body Text with Xaml" TextWrapping="Wrap" Margin="2" VerticalAlignment="Center"/>
- </Border>
- </Grid>
- </UserControl>
After that go back to MainPage.xaml.cs and add the following code:
- private void CustomPopupXaml_Click(object sender, RoutedEventArgs e)
- {
- MessagePrompt ObjMessagePrompt = new MessagePrompt();
- ObjMessagePrompt.VerticalAlignment = VerticalAlignment.Center;//Align message prompt to center.
- ObjMessagePrompt.Title = "Xaml";
- ObjMessagePrompt.Body = new UcMsgBody();
- ObjMessagePrompt.Show();
- }
Custom MessagePrompt with C#:
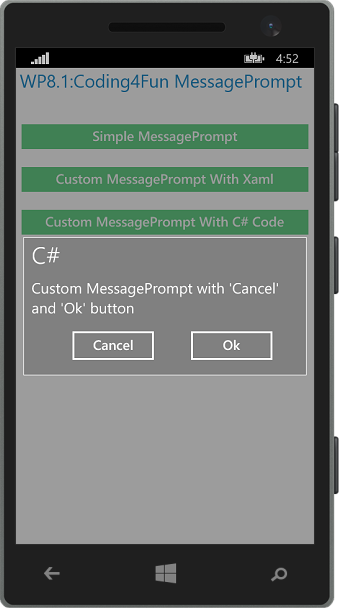
We can also add our custom buttons for 'Ok' & 'Cancel' buttons like this.
- MessagePrompt ObjMessagePrompt;
- private void CustomPopupCode_Click(object sender, RoutedEventArgs e)
- {
- ObjMessagePrompt = new MessagePrompt();
- ObjMessagePrompt.Title = "C#";
- ObjMessagePrompt.VerticalAlignment = VerticalAlignment.Center;//Align message prompt to center.
- ObjMessagePrompt.Message = "Custom MessagePrompt with 'Cancel' and 'Ok' button";
- ObjMessagePrompt.Background = new SolidColorBrush(Colors.Gray);
- ObjMessagePrompt.ActionPopUpButtons.Clear();//Clearing all defualt messageprompt buttons.
- Button customCancelButton = new Button() { Content = "Cancel" };
- customCancelButton.Click += new RoutedEventHandler(customButton_Click);
- ObjMessagePrompt.ActionPopUpButtons.Add(customCancelButton);
- Button customOkButton = new Button() { Content = "Ok" };
- customOkButton.Click += new RoutedEventHandler(customButton_Click);
- ObjMessagePrompt.ActionPopUpButtons.Add(customOkButton);
- //Making Space between cancel and ok buttons
- ObjMessagePrompt.ActionPopUpButtons[0].Margin = new Thickness(20, 0, 0, 0);
- ObjMessagePrompt.ActionPopUpButtons[1].Margin = new Thickness(50, 0, 0, 0);
- ObjMessagePrompt.Show();
- }
- void customButton_Click(object sender, RoutedEventArgs e)
- {
- ObjMessagePrompt.Hide();//To close MessagePrompt
- }
Here you may note some useful points:
1)MessagePrompt alignments:
To align center:
ObjMessagePrompt.VerticalAlignment = VerticalAlignment.Center;//Align message prompt to center.
2)To Remove MessagePrompt Default 'Ok' Symbol:
ObjMessagePrompt.ActionPopUpButtons.Clear();//Clearing all defualt messageprompt buttons.
3)To add custom button:
ObjMessagePrompt.ActionPopUpButtons.Add(customOkButton);
Source code is available here.
Summary:
From this article we have learned "MessagePrompt Control in windowsphone 8.1 application".
FeedBack Note:
Please share your thoughts,what you think about this post,Is this post really helpful for you?I always welcome if you drop comments on this post and it would be impressive.
Advertisemen


Tidak ada komentar:
Posting Komentar