Advertisemen
Introduction:
Windows store is the place where user can Install/purchase apps for Windows and windows phone devices. In order to get any Windows/WindowsPhone apps, including free apps from windows store user’ll be prompted to set up a Microsoft account, or use his/her existing Microsoft email to start using Windows store apps. Once user set up an account, with an email and password, user can start using the Windows app store.
Also as a windows app developer, we have to submit our UWP app to windows store. So that user can start to use our app by installing it from windows store.
Note: If you are new to Windows 10 UWP app development, please read Windows 10 Beginners Guide.
Requirements:
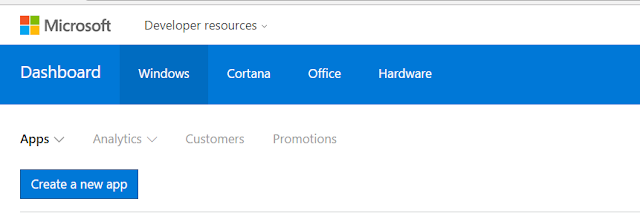
Go to Windows Developer website and login here. Click on "Create new app".
2. Pricing and Availability:
If you want to make your app for free usage, you can select Base price is for free and you have to mention Free trial is for trial never expires. Also you can select which market place you want to release your app.
3. Properties:
Pick the category (and subcategory, if applicable) that best describes your product
Windows store is the place where user can Install/purchase apps for Windows and windows phone devices. In order to get any Windows/WindowsPhone apps, including free apps from windows store user’ll be prompted to set up a Microsoft account, or use his/her existing Microsoft email to start using Windows store apps. Once user set up an account, with an email and password, user can start using the Windows app store.
Also as a windows app developer, we have to submit our UWP app to windows store. So that user can start to use our app by installing it from windows store.
Note: If you are new to Windows 10 UWP app development, please read Windows 10 Beginners Guide.
Requirements:
- This article is targeted for windows 10 Anniversary Update, so make sure you’ve downloaded and installed the latest Anniversary Windows 10 SDK from here.
- We no longer need a developer license with Windows 10. But we must Enable Developer Mode to your device for development.
- This post assumes you’re using Microsoft Visual Studio 2015 Update 3 or Later.
- This article is developed on windows 10 machine.
Description:
For submitting Windows 10 UWP app to windows store, first we need to register for Windows Store developer account. So please register from here for developer account.
Also we need follow to below steps to submit UWP app.
- Register for UWP app name
- Pricing and Availability
- Properties
- Age ratings
- Packages
- Store listings
- Notes for certification(Optional)
Go to Windows Developer website and login here. Click on "Create new app".
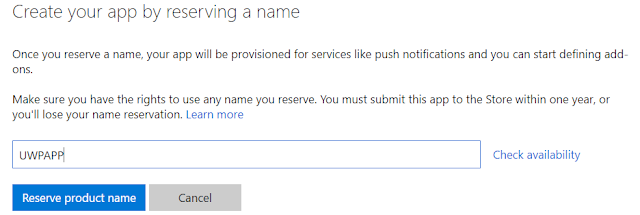
Type your choosen app name, and click on "Check availability".
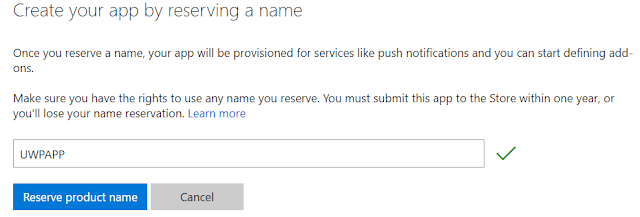
If your app name is available, that means your are eligible for submission with the same app name. Also it will show green tick mark like below screen. So click on "Reserve product name" to register your app name from windows store and also please note that you must submit your reserved app to Store within one year, or you'll lose your name reservation
Now your app reservation has been completed, and here our name is "UWPAPP". We are ready for app submission, so click on "Start your submission".
Initially, it will show below default screen with "Not started" status.
If you want to make your app for free usage, you can select Base price is for free and you have to mention Free trial is for trial never expires. Also you can select which market place you want to release your app.
Pick the category (and subcategory, if applicable) that best describes your product
Also specify any hardware features (Mostly enable Touch screen) that are required or recommended in order for your app to run properly. And click on "Save" button.
4. Age ratings:
To publish an app in the Windows Store, you must provide accurate answers to the questions below and receive age ratings.
Selected your APP Type name is "Reference, News, or Educational" and answere the questions with almost "No" like below:
5. How to upload Windows 10 UWP app Packages?:
We have to follow below steps to upload Windows 10 UWP app package to Windows Store.
Step 1: Before going to upload Packages, first we need to create UWP project for .Appx file. So first create new Windows 10 UWP project with Visual Studio 2015
Step 2: Next dialog will ask for you to confirm that your app support min & target versions. For this sample, I target the app with minimum version 10.0.10240 like below:
Step 3: Now project creation has been completed, so add your code as per your app requirement and before generating UWP app build file (.APPX), first we need to set Debug option to "Release" mode.
Step 4: Now it is time for create app package, so right click on your Project => Store => Create App Packages
Step 5: In the Create App Packages wizard, select 'Yes' If you want to upload app package to windows store.
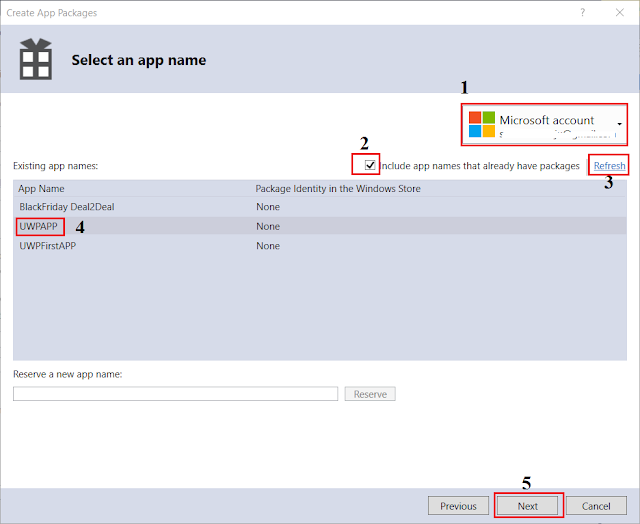
Step 6: In Next dialog, Click on "Add an account" to add Microsoft account.
After that, it will ask your Microsoft developer account email and password. So that you have to enter valid details.
So once you login with your developer credentials, click on "Refresh" button to get list of existing app names. So select our app name is "UWPAPP" and click on "Next" button.
Step 7: The next dialog provides a choice of processor platforms to target. However, if you are using platform specific binaries in your app, you’ll need to build separate packages for each platform.
Note: Please select "Always" option for Generate app bundle. or you will get below error message on .APPX file upload package in windows store.
"Package acceptance validation error: You cannot submit pre-compiled .NET Native packages. Please upload the Store appxupload file and try again. http://go.microsoft.com/fwlink/?LinkId=797528"
Then wizard gives us a link to where the package was created.
Step 8: We can also test certification checks process by launching the kit. So Click on "Launch Windows App Certification Kit" from above screen. Please "Select All" and click on "Next" to run certification test
the certification checks process starts like below
And your app should pass initial validation like below screen.
Step 9: Let's return to our Windows Developer website, and click on "Packages" to upload package. You will get below default screen
Click on "browse your files" from above screen and we have to browse our .appxupload file, which was located at below path.
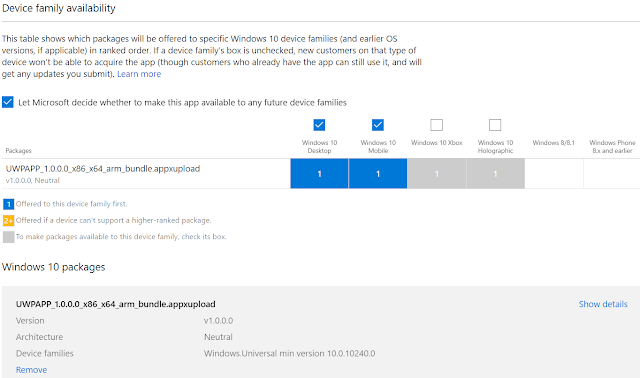
After that, we will get confirmation message that shows our package has been uploaded successfully. And click on "Save" button.
Note: Your "Display name" in Package.appxmanifest file should be match with reserved App name from Windows Store developer account.
6. Store listings:
Here we have to enter and fill below information and click on "Save" button.
Provide any info that helps testers use and understand this submission. Customers won't see this info.
For example:
Follow me always at @Subramanyam_B
Here we have to enter and fill below information and click on "Save" button.
- Description: Enter the your information that describes about your APP.
- At-least one device family screenshot
- App tile icon: Required for proper Store display if your app supports Windows Phone 8.1 and earlier. And Image size is 300 x 300 pixels and accepted file types is .png
- Keywords: We can provide 7 keywords, one per box 30 character limit for each keyword Up to 3 words per keyword
Provide any info that helps testers use and understand this submission. Customers won't see this info.
For example:
- Username and password for a test account
- Steps to access hidden or locked features
- Steps to verify background audio usage
After reviewing your details click on"Submit to Store" button for final submission. And it will take minimum 1 working day to pass your app into app store. Also you can see certification status from below screen.
And you will get couple of mails about
- Certification error (If your app was rejected by certification team)
- Certifying that your app will suitable for all ages
- Confirming that certification pass
Follow me always at @Subramanyam_B
Advertisemen







Tidak ada komentar:
Posting Komentar